Tech Tip: Use Geodatabase Attachments with TerraSync and Trimble Positions
Background: Historically, photo fields for Terrasync were created in the data dictionary editor. Trimble Positions gets the data dictionary from your geodatabase to create a Trimble project definition. From there, the schema should not be altered. Thus, photos are to be added to both the geodatabase (gdb) and the data dictionary (from the gdb schema) using attachments.
Steps:
- Right-click a feature class in the gdb>Manage>Create Attachments.
- Create the Trimble Positions Project as directed.
- Highlight the project and click Edit.
- Click Save to ddf (this creates 1 photo or file name attribute in the data dictionary).
- Click Edit DDF.
- In the Data Dictionary Editor, highlight the photo field. Copy paste it as many times as you think you will need features. (Ex. If you’d like to take 3 pictures of each feature, then copy & paste 3 times). DO NOT RENAME THE FIELDS!!
- Save the DDF
- Close the Data Dictionary Editor
- Back in the Trimble Positions Project Editor, click Update from DDF. Browse to the edited data dictionary above when prompted.
- Transfer the ddf to the GNSS unit running Terrasync.
- Collect a point and take up to 3 photos.
- Close the data file.
- Data Transfer the data file back to the desktop pc.
- Open the Trimble Positions dockable window. Click Check in SSF and browse to the new data file.
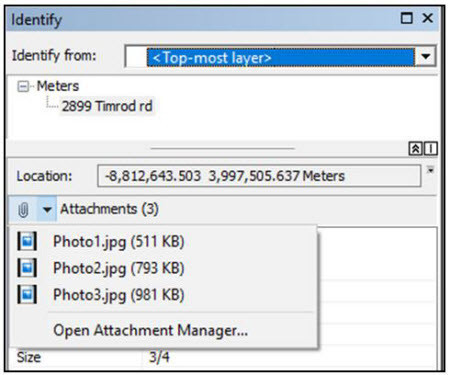
- Use the Identify button in ArcMap:
